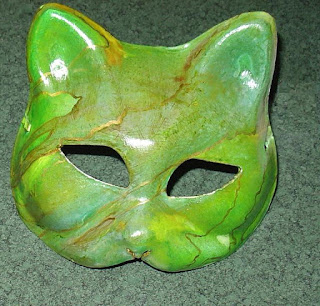
The way I'd intended to decorate this mask didn't happen. The outcome was a complete surprise! See below for my partner's Very Clever Way to cut air holes in them, because they fit so closely to your face.
This project uses a Paper Mache Cat Mask,
*Dharma's Fiber Reactive dyes
Green ( #1 Lemon Yellow mixed with #25 Turquoise) and #119 Red Violet, applied with a Preval Spray Gun
*Spray Fixative,
*Mod Podge and Acrylic gold paint- applied with a brush:
Click on the image for complete Instructions
Tips:
*Take off the elastic band before spraying. Replace with metallic elastic at the end of the project.
* Use dye concentrate. Spraying diffuses the color. Your concentration should be strong enough to see light thru it, in a clear cup; but not necessarily it's true color. The exception is yellow, which should be fairly opaque.
*Sieve the dye when filling the spray gun. (see photo how to)
*The smooth coating on this mask is porous. It EATS dye.
*Spray your contrast color while the first color has soft-dried;
like within 20 minutes. That way you'll get both good absorption, but the second coat will also run and flow.
*Sealing the mask before you add gold keeps the gold from absorbing too much.
The "mistakes" on this project
1. It was supposed to be a high-contrast look; Red-violet over green. NOT.
2. It it reminded me of Malachite or Moss Agate. But "The Malachite Cat" sounded like a great title, even if it isn't a more bluish-green.
3. The surface coating is fragile; you can see scratches in it, once it's been saturated. This contributed,
( IMO), to an organic look. Like some of the poor rocks I've cut on lapidary saws.
3. To pass the "Torchlite Test", it needed shinies or metallics. But any jewels or trim I tried took away from it's integrity. In the end, I used metallic gold paint to enhance some of the "veining", and to finish the eyes and nose. A double coating of Gloss mod podge gave it a polished stone-like quality


No comments:
Post a Comment